When we are using Microsoft Word as a word processing Software, we need many times to print document. There are large numbers of option and setting available to print MS Word document. With limited knowledge you most of time print document with default setting or previous printed setting and end up with printed document that not exactly what we want or needed.
That’s why we’ve put together a video (Vlog) plus text (Blog) tutorial of all available printing option and setting that you should keeping in the mind next time while printing documents.
1st Step: Print Preview
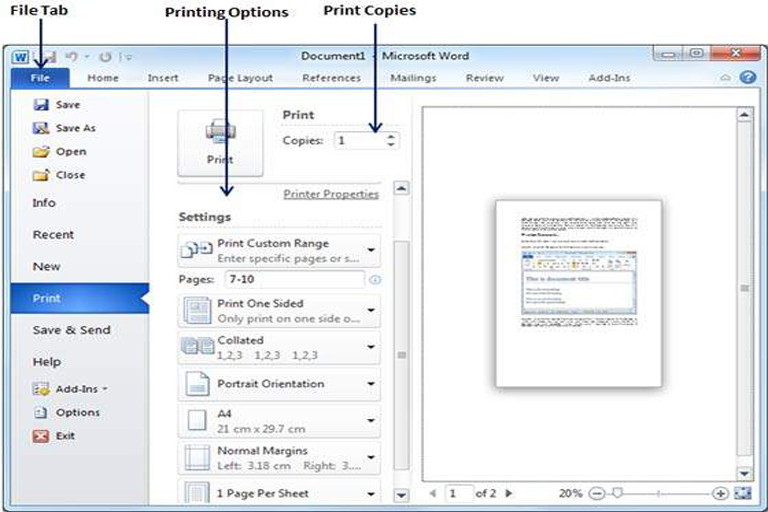
Before you print anything, you’ll want to preview it. Just go toFile > Print to see a preview of your document. From there, you’ll also be able to adjust different page layout and printing settings, such as the page orientation, paper size, margin width, and more. Any changes you make will be updated in the preview pane as well.
2nd Step: No of Print Copies required
Set the number of Print -> Copies required. You can just enter the number of copies or click on up/down arrow to increase and decrease the number of copies.
3rd Step: Select the Printer Option
In Printer dropdown list you can find list of printer installed on your computer. You can select the printer from dropdown. One thing is important here is; only printer with ready status will print your document. Few other options are to save document in Adobe PDF format or Fax the document using required software and hardware installed on your system. Other option are meant for saving document for further printing uses.
4th Step: Other core setting option for printing output
Select the pages from document to be printed. It may be Print All Pages or Print Current Page or Print Custom Range. As other are self-explanatory Print Custom range is option where you can give range of document to print. For Example: 1-3 will print 1st to 3rd page of document. OR 2-4,7-8 will print 2nd, 3rd, 4th , 7th , 6th ,8th page of document.
Select the position of printing on front and back of paper. You can select option Print One Side, Print Both Side, Print on Both Side and Manually Print on Both sides.
You can select Collated or Uncollated option for printing. It is only relevant when you want to print more the one copy. In case of Collated printing 1st copy of complete document completed then next copy will get printed and this way of printing sequence continues till completed. But is case of Uncollated required number of copy of 1st page get printed then next page and soon.
Now selects the printing orientation from Portrait Orientation or landscape Orientation. You can view difference in preview.
Next is select the Size (A4, Letter, etc.) of page from list of standard page size or you can set your own customize page size.
You can also select pre-set standard margin option for printing or you can also custom Margin as per printing need.
Now you can select no. of page per Sheet if required.
After selecting all option as per required printing output. Now checking all option one more time clicks on Print button to print the document.


0 responses on "Steps to Printing Microsoft Word Documents"